Guidance for Developing Accessible PDF Content
PDF documents are commonly used to share finalized forms, reports, manuals, and other official materials. When created correctly, PDFs can preserve structure, links, headings, tables, and other accessibility features needed by users who rely on assistive technology.
Accessible PDFs improve usability for all users and help ensure that documents published on the MCCB website meet accessibility standards. Whenever possible, PDFs should be created from an accessible source document, such as Microsoft Word, rather than scanned or flattened images.
Before You Create
Before creating or submitting a PDF, consider whether a PDF is the most appropriate format.
- Can this content be presented as a webpage instead?
- Is a PDF necessary for printing, official distribution, or formatting purposes?
- Was the original source document created accessibly before being converted?
- Is this document current and necessary for website publication?
The MCCB website is not a document repository. Only necessary, accessible documents should be submitted for publication.
Creating Accessible PDF Documents
Accessibility in PDFs begins with the source document. A PDF should not be used to fix accessibility issues that exist in the original Word, Excel, or PowerPoint file.
Step-by-Step Guide
- Start with an Accessible Source Document
An accessible source document is the original Word, Excel, or PowerPoint file that has been properly formatted for accessibility before being converted into a PDF. Accessibility features such as headings, lists, table headers, alt text, reading order, and descriptive links should be added and checked in the original document first.
The following accessibility practices should be completed in the original document before converting or exporting the file to PDF:
- Use built-in heading styles.
- Use built-in list tools for bullets and numbering.
- Add descriptive alt text to meaningful images.
- Use clear and descriptive link text.
- Create simple tables with header rows.
- Avoid using color alone to convey meaning.
- Run the Accessibility Checker before exporting.
- Export the Document Correctly
- Select File.
- Select Save As or Export.
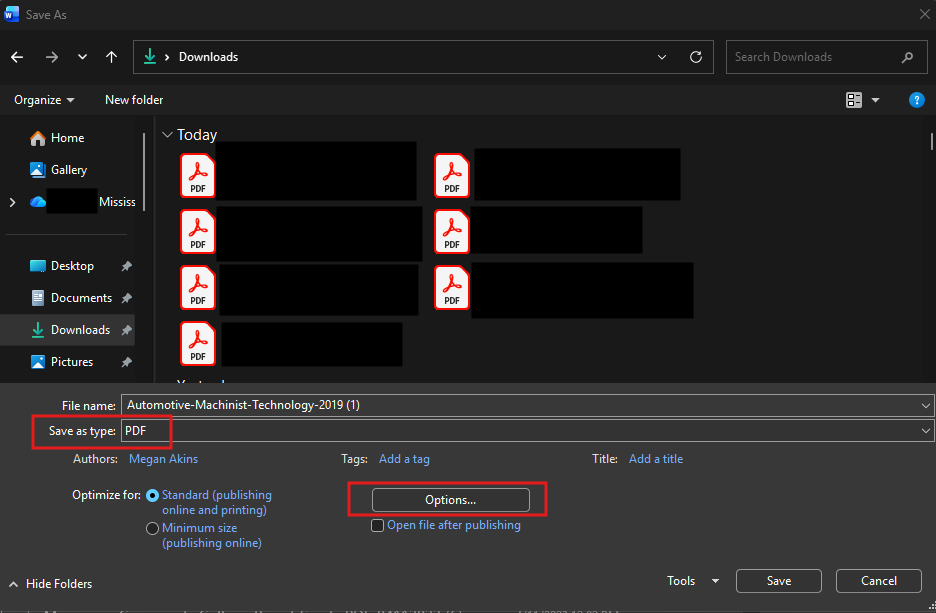
Select Browse and choose where to save your document.
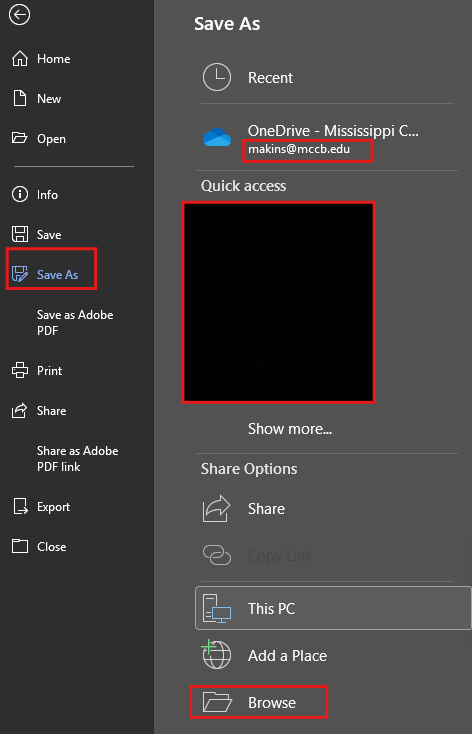
- Choose PDF as the file type.
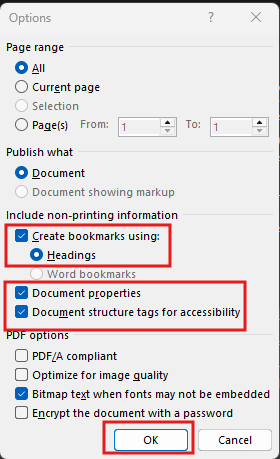
Select Options before saving.
- Ensure Document structure tags for accessibility is checked.
- Ensure Create bookmarks using: Headings is selected.
Select OK, then Save.
- Check the PDF in Adobe Acrobat Pro
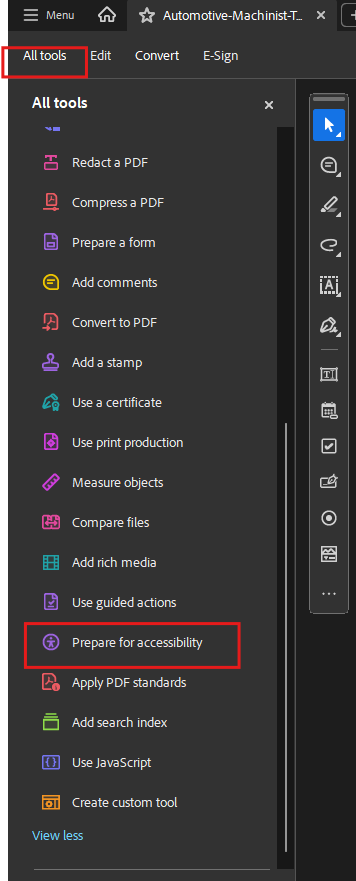
- Open the PDF in Adobe Acrobat Pro.
- Select All Tools.
Select Prepare for Accessibility.
Select Check for Accessibility.
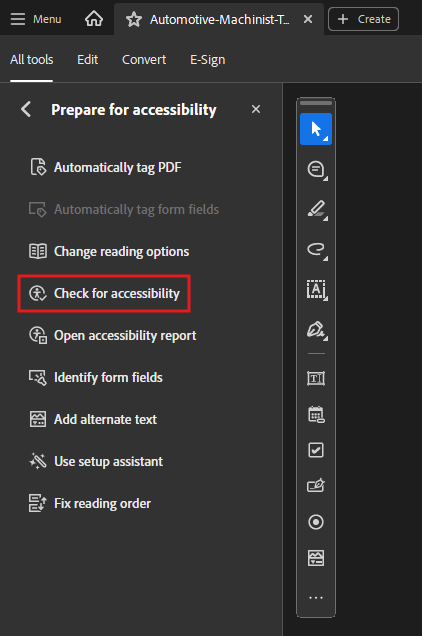
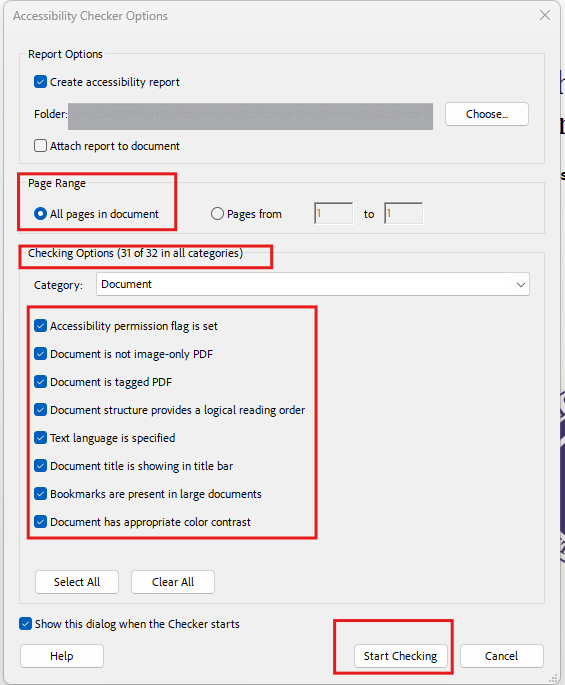
- Make sure to select All pages in document and check all options under Checking Options.
Select Start Checking
- Review the results.
- Fix any errors identified in the report.
- Re-run the accessibility check after corrections are made.
Common PDF Accessibility Items to Check
- Document Title
The Document Title in a PDF is metadata that identifies the document’s name when opened in a PDF reader. For accessibility, the title should clearly describe the document and be set to display in the title bar instead of the file name. This helps users—especially those using screen readers—understand what the document is without relying on the file name.
Setting Document Title
- Open your PDF in Adobe Acrobat Pro.
- Click Menu.
- Select Document Properties.
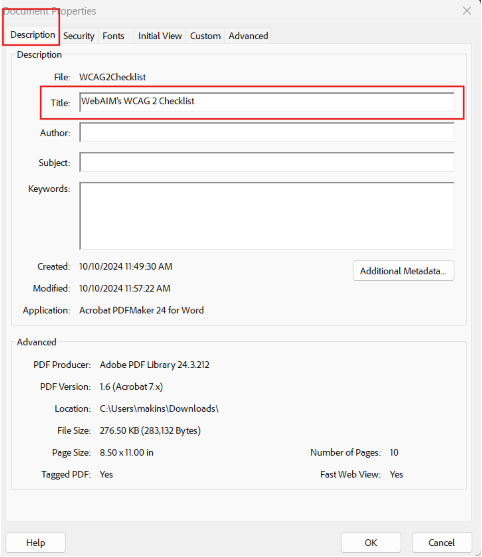
- In the Description tab:
- Locate the Title field
- Enter a clear, descriptive title for the document
Example: 2026 Annual Report – Mississippi Community College Board
- Select the Initial View tab.
- Find the Window Options section.
- Set Show to:
Document Title (instead of File Name)
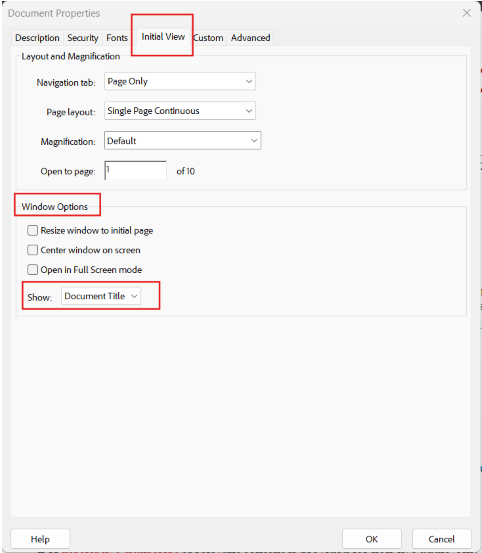
- Click OK to save your changes.
- Save the document.
- Close and reopen the PDF to confirm:
- The title appears correctly in the window title bar
Best Practices
- Use a clear, descriptive title (not just “Document” or a file name)
- Match the title to the document’s main heading when possible
- Avoid abbreviations unless they are widely understood
- Reading Order
Reading options in a PDF control how the document is interpreted and read by assistive technologies like screen readers. These settings help ensure content is read in the correct order, language is properly identified, and the document is navigable for users with disabilities.
Setting Reading Options and Language
- Open your PDF in Adobe Acrobat Pro.
- Click Menu.
- Select Document Properties.
- In the Advanced tab:
- Locate the Language field
Select the correct language (e.g., English)
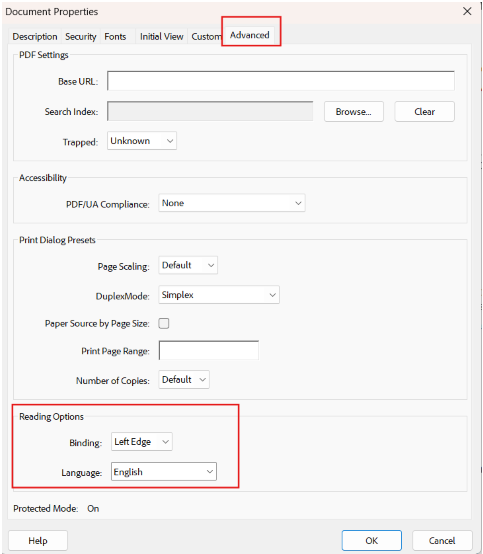
- Click OK
Set Reading Order (if needed)
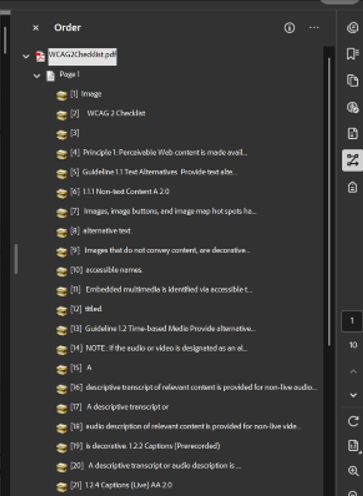
- Click Reading Order icon in the right accessibility tools pane.
- Review how content is structured:
- Ensure headings, paragraphs, lists, and tables are in the correct order
Make adjustments if content is read out of sequence
- Go to Prepare for Accessibility → Check for Accessibility.
- Review results for:
- Reading order issues
- Missing tags or structure problems
Best Practices
- Always set the document language
- Ensure the reading order matches the visual order
- Use properly tagged PDFs (from Word export) to avoid manual fixes
- Verify with the Accessibility Checker before publishing
- Tags
Tags in a PDF provide the underlying structure of the document, similar to HTML. They define elements such as headings, paragraphs, lists, tables, and images so that assistive technologies (like screen readers) can interpret and navigate the content correctly. A properly tagged PDF ensures content is read in the correct order and is accessible to all users.
Check and Fix Tags
- Open your PDF in Adobe Acrobat Pro.
- Select the AllTools tab.
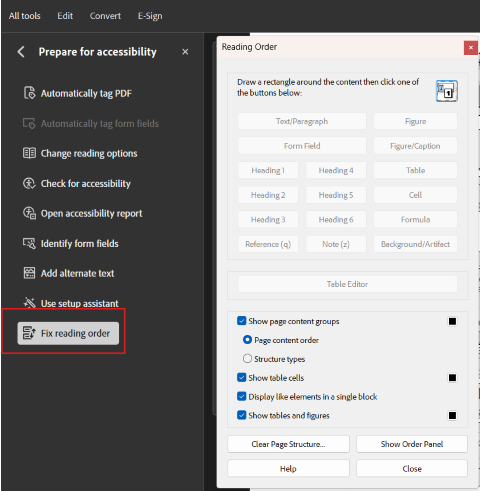
- Click Prepare for Accessibility.
- Select Fix Reading Order.
View Tag Structure
- Open the Tags Icon
- Review the tag tree:
- Look for properly structured elements such as:
<H1>, <H2>(Headings)<P>(Paragraphs)<L>(Lists)<Table>(Tables)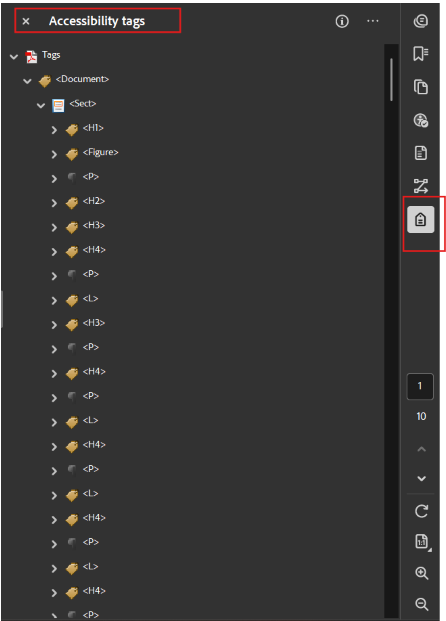
- Look for properly structured elements such as:
- Ensure tags follow a logical reading order from top to bottom.
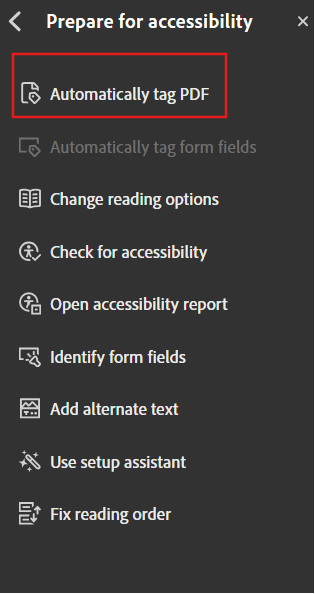
Add or Fix Tags (if needed)
- If tags are missing:
Go to Prepare for Accessibility → Automatically tag PDF (quick starting point)
- Use Reading Order tool to:
Assign correct tags (Heading, Text, Figure, Table)
- Right-click tags in the Tags Panel to:
- Rename or adjust structure
- Move items into the correct order
Best Practices
- Always start with a properly formatted Word document (headings, lists, tables)
- Export using “Document structure tags for accessibility” enabled
- Avoid relying solely on Autotag—always review manually
- Keep tag structure simple and logical
- Links
Links in a PDF allow users to navigate to external websites, email addresses, or other locations within the document. For accessibility, links must be properly tagged and include clear, descriptive text so users—especially those using screen readers—can understand the purpose of the link without needing additional context.
How to Check and Fix Links in a PDF
- Open your PDF in Adobe Acrobat Pro.
- Select the All Tools tab.
- Click Edit PDF.
- Scan the document to ensure links are:
- Clickable
- Directing to the correct destination
Check Link Tags
- Click the Tags Icon
- Locate link elements:
- Look for
<Link>tags in the structure
- Look for
- Expand the
<Link>tag to confirm:- It contains meaningful text (not just a URL)
Fix or Add Links
- To edit an existing link:
- Right-click the link → Edit Link
- Update the URL if needed
- To add a new link:
- Go to Tools → Edit PDF → Link → Add/Edit Web or Document Link
- Draw a box around the text
- Enter the correct URL
Links should clearly describe where the user will go.
- Avoid using full URLs as link text unless necessary.
- Avoid vague phrases such as “click here,” “link,” or “more.”
- Use descriptive link text, such as View the 2026 Annual Report (PDF).
- Test each link to make sure it works.
Best Practices
- Use descriptive text that explains the link’s purpose
- Ensure links are properly tagged in the PDF structure
- Include file type when linking to downloads (PDF, Excel, etc.)
- Test every link before publishing
- Scanned PDFs
Scanned PDFs are often not accessible because they are created as images of text instead of actual readable text. While the document may look correct visually, screen readers and other assistive technologies may not be able to read or navigate the content properly.
Whenever possible, avoid uploading scanned documents and instead create PDFs directly from accessible source files such as Microsoft Word.
If a scanned document must be used, run Optical Character Recognition (OCR) on the file. OCR is a process that converts scanned images of text into selectable and searchable text that assistive technologies can recognize.
After running OCR:
- Review the document carefully for errors or missing content
- Confirm that text can be selected and searched
- Verify that screen readers can properly read the content
- Add tags, headings, alt text, and correct reading order as needed
- Check tables, lists, and links to ensure they remain accessible
How to Run OCR in Adobe Acrobat Pro
- Open the scanned PDF in Adobe Acrobat Pro
Select Scan & OCR from the Tools menu
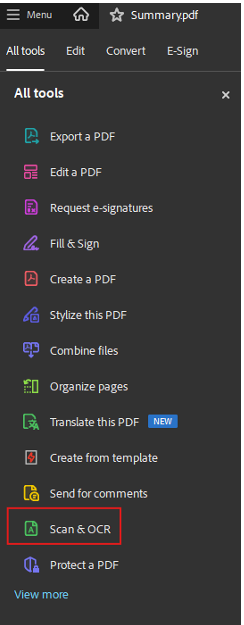
- Select In This File
- Click Recognize Text to begin the OCR process
- After OCR finishes, test the document by trying to highlight or search for text within the PDF
- Run the Accessibility Check and manually review the document for reading order, headings, tags, alt text, tables, and link accessibility
Important: OCR does not automatically make a document fully accessible. It only converts the scanned image into readable text. Additional accessibility review and remediation may still be required.
Tools and Resources
Support Pages
- Microsoft: Create accessible PDFs
- WebAIM: PDF Accessibility
- Section508.gov: Create Accessible PDFs
- Adobe Acrobat: Create and Verify PDF Accessibility
- National Center on Disability and Access to Education: PDF Cheatsheet
- PAC - Free PDF Accessibility Checker